I have been so busy shoveling and de-icing, that I haven't had a chance to try any new recipes or post any pics!
Regarding the fruit & nut oatmeal:
I tried this recipe out again, but made a few minor changes and I think I like it even better. Instead of the dried cherries, I added a 1/2 cup of homemade applesauce and when I added the nuts and brown sugar at the end, I sprinkle a little unsweetened coconut across the top. Very good and I think the applesauce gave the oatmeal a softer texture when reheating.
This is a great recipe because you can easily get 4 breakfasts out of the recipe and you have nearly a full work week of to-go breakfasts made in about 30 minutes.
Thursday, January 27, 2011
Thursday, January 13, 2011
Results of the snowstorm
I was not nearly as productive as I would have liked during the snowstorm yesterday, however, shoveling the front walk and driveway numerous times killed my interest in doing anything more. I did manage to make a giant pot of chili for the work potluck with enough to freeze for a few dinners, a roasted chicken with homemade stuffing and cranberry sauce and finally, a banana chocolate chunk coffee cake for work this morning. Since only 4 of my co-workers showed, I might be taking the rest home.
 |
| Roasted chicken with lemon and sage butter rub |
 |
| Beef Chili with Beans |
 |
| Banana Chocolate Chunk Coffee Cake |
Tuesday, January 11, 2011
Snowstorm brewing..
With a snowstorm on it's way, I'm headed to the grocery store and to my pantry cabinets for some supplies because I will be cooking and baking all day tomorrow. 10-15 inches expected! Pics to follow...
Monday, January 10, 2011
Blah it's Monday already :(
Unfortunately it's Monday morning yet again, however, the week started off well with my baked fruit and nut oatmeal. I'm looking forward to the upcoming snow Tuesday night into Wednesday, hopefully I'll be able to try out some new recipes and post pics. I have a bunch of black bananas waiting for me on the kitchen counter, so banana muffins may be in the next post!
Sunday, January 9, 2011
Cranberry Orange Bread...
I love fresh cranberry sauce and have a tendency to go overboard in my fresh cranberry purchases each year when in season. Since I have 3 bags of fresh cranberries in the fridge, today is a perfect day for Cranberry Orange Bread. I think my honey's co-workers will be happy with tomorrow's breakfast delivery!
Preheat oven to 350 degrees.
Grease & flour a 9x5x3 inch loaf pan.
In medium sized bowl combine: flour, 1 cup sugar, baking powder, baking soda and salt.
In large bowl combine: orange juice, egg, zest & melted butter.
Add dry ingredients to wet ingredients, mix well.
Add cranberries and combine.
Pour in buttered & floured loaf pan, spread. Top with 1 Tablespoon sugar and additional chopped cranberries if desired.
Bake1 hour or until cake tester comes out clean.
Let cool for 20 minutes before serving.
 |
| Mix flour, sugar, baking powder, baking soda & salt in a medium bowl... |
 |
| In a large bowl, mix orange juice, egg, zest & melted butter... |
 |
| Add dry ingredients to wet ingredients and mix well... |
 |
| Add the cranberries and combine... |
 |
| Grease & flour loaf pan and spread batter in pan... |
 |
| Sprinkle batter with 1 Tablespoon sugar and additional chopped cranberries if desired... |
 |
| Bake 350 degrees for 1 hour... |
Cranberry Orange Bread
- 2 cups all purpose flour
- 1 cup plus 1 Tablespoon (for sprinkling) sugar
- 1 1/2 teaspoons baking powder
- 1/2 teaspoon baking soda
- 1 teaspoon salt
- 3/4 cup plus 2 Tablespoons orange juice
- 1 large egg, at room temperature
- 1 Tablespoon grated orange zest
- 2 Tablespoons unsalted butter, melted
- 1 cup whole cranberries, coarsely chopped
Preheat oven to 350 degrees.
Grease & flour a 9x5x3 inch loaf pan.
In medium sized bowl combine: flour, 1 cup sugar, baking powder, baking soda and salt.
In large bowl combine: orange juice, egg, zest & melted butter.
Add dry ingredients to wet ingredients, mix well.
Add cranberries and combine.
Pour in buttered & floured loaf pan, spread. Top with 1 Tablespoon sugar and additional chopped cranberries if desired.
Bake1 hour or until cake tester comes out clean.
Let cool for 20 minutes before serving.
Fruit & Nut Baked Oatmeal...
A great way to start the day with a warm bowl of Fruit & Nut Baked Oatmeal :)
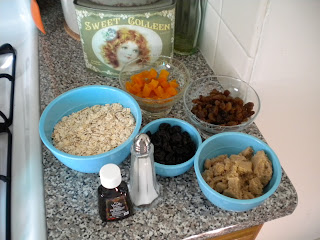
Getting started, you will need the ingredients below:
In a medium saucepan bring milk and butter to a boil. Stir in apricots, cherries, raisins, 2 Tablespoons packed brown sugar, vanilla and salt. Cook & stir for 1 minute. Pour into a lightly greased 1 1/2 quart casserole.
Bake, uncovered, in a 350 degree oven for 15 minutes. Sprinkle with remaining 2 Tablespoons packed brown sugar and nuts. Bake 5 more minutes or until bubbly. Let cool slightly. Serve with additional milk if desired.
Enjoy!
Getting started, you will need the ingredients below:
 |
| Bring milk & butter to a boil in a saucepan... |
 |
| Add oats, apricots, cherries, raisins, vanilla, salt & 2 tablespoons packed brown sugar. |
 |
| Stir and cook for 1 minute... |
 |
| Pour into lightly greased 1 1/2 quart baking dish... |
 |
| Bake uncovered in 350 degree oven for 15 minutes... |
 |
| Top oatmeal with walnuts and remaining 2 tablespoons packed brown sugar. Bake 5 more minutes or until bubbly... |
 | ||
| Cool slightly. If desired, serve with additional milk. |
Fruit & Nut Oatmeal:
*Makes 4 main dish servings- 1 3/4 cups milk
- 2 Tablespoons butter
- 1 cup regular rolled oats
- 1/3 cup snipped dried apricots
- 1/2 dried tart cherries
- 1/3 cup golden raisins
- 4 Tablespoons packed brown sugar
- 1/2 teaspoon vanilla
- 1/4 teaspoon salt
- 1/2 coarsely chopped walnuts or pecans
In a medium saucepan bring milk and butter to a boil. Stir in apricots, cherries, raisins, 2 Tablespoons packed brown sugar, vanilla and salt. Cook & stir for 1 minute. Pour into a lightly greased 1 1/2 quart casserole.
Bake, uncovered, in a 350 degree oven for 15 minutes. Sprinkle with remaining 2 Tablespoons packed brown sugar and nuts. Bake 5 more minutes or until bubbly. Let cool slightly. Serve with additional milk if desired.
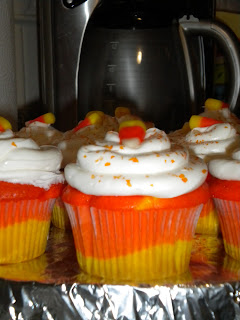
Candy Corn Cupakes
 |
| Cupcakes packaged and ready to party!... |
This recipe came from www.ourbestbites.com
Please note that I did not use their frosting suggestion and just used canned vanilla frosting to save myself time:
Candy Corn Cupcakes
1 18.25-oz. white cake mix (I prefer Duncan Hines)
1 c. sour cream
1/2 c. vegetable oil
3 large eggs
1 tsp. almond extract
Yellow and orange Wilton food gel (about a heaping 1/2 tsp. of each)
Preheat oven to 350 degrees. Line 2 24-cup muffin tins with white paper liners (although you may not make it to 24 cupcakes). Combine all ingredients except for food coloring in a large bowl and beat on low speed for 1 minute. Scrape down the sides of the bowl and then beat on medium for 2 additional minutes.
Divide batter equally into two bowls; you should have about 2 1/4-2 1/2 c. of batter in each bowl.Mix about 1/2 heaping tsp. of yellow coloring into one bowl of batter and 1/2 heaping tsp. of orange coloring into the other bowl. Divide the yellow batter evenly among the muffin tins. I used a standard cookie scoop, which measures about 1 Tbsp. I only had enough to make 20 cupcakes with the cups filled about halfway. Holding the edges of each pan firmly, bang the pan a few times on the counter to level out the batter. Repeat the process with the orange batter. Bake for 20-22 minutes or until a toothpick inserted into the center of a cupcake comes out clean. Remove from oven and allow to cool for about 5 minutes in the pan and then allow to cool completely on a cooling rack.
Friday, January 7, 2011
Snow Day!!!
Today I am lucky enough to be sitting home watching the snow blow by the window. The cooking for my mom's birthday dinner for tomorrow night is already underway. We are having a fiesta; complete with Baja Fish Taco's, Chicken and Cheese Enchiladas, yellow rice and veggies. The enchilada sauce is simmering and the chicken is cooked...
Welcome!
Hello to any and all readers!
This is my first blog and I'm eager to see if there will be any followers.
I would like to introduce myself. I'm a 30 year old gal that loves to cook, bake and feed people. According to the love of my life, I serve very large portions, but I can't help myself ;) I love to make people happy and what better way than a steaming plate of baked mac & cheese or slice of apple crumb pie?!
A family party never fails with one of the aunts responding with "I'll have just a sliver". A S-L-I-V-E-R they yell as if announcing to the entire room that they just want the sliver will immediately relieve them of all calories they are about to consume! I say if you're going to eat cake, eat a big old heaping slice, add a scoop of ice cream and make up for it in tomorrow's workout!
In this blog I will share photos and recipes of what's cookin' in my kitchen, antic dotes from my day, stories about family and everything in between. Hopefully I can make you drool with my pics and give you a little giggle from time to time :)
Enjoy and keep reading!
The Comfort Food Queen
Subscribe to:
Comments (Atom)


